
Configure VSCode for Java Deveopment in Linux is quite tricky. To reach the goal just follow the steps bellow.
Now lets dive for Fedora 33. You can download fedora from Fedora
Step 1: Make sure you have VSCode installed up and running.
Step 2: In the Extension panel search for Java. Just type java and install Java Extension Pack look like bellow image. All the extensions will be download and installed

Step 3: Here we will create spring boot application. For that another extension has to be installed. Just type spring and install the extension look like bellow image.

Step 4: After those installation open command palette with alt + shift + p and type in palette spring initialize and select create a maven project and press enter.
Step 5: Next select spring boot version, project language, give a group id, input artifact id, specify packaging type, specify java version that is open jdk, finally select dev dependency that you are needed. And finally press enter to save a config file.
Step 6: Select a directory to install the zip file.
Step 7: First extract the zip file to a development directory. And open the main application java class.
Step 8: Now Its time to setup the java environment. VSCode will indicate the open JDK not found error. Just press download button like bellow image.
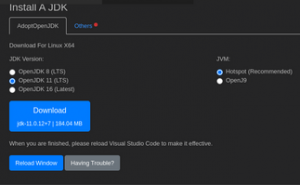
Extract the tar.gz file to /usr/lib/jvm directory.
Step 9: After that setup the JAVA_HOME. Open .bashrc profile with following command
-> vim ~/.bashrc
Insert the following lines in it.
export JAVA_HOME=/usr/lib/jvm/jdk-11.0.12+7
export PATH=$PATH:$JAVA_HOME/bin
export CLASSPATH=.:$JAVA_HOME/jre/lib:$JAVA_HOME/lib:$JAVA_HOME/lib/tools.jar
Run the source cammand to set the global effect.
-> source ~/.bashrc
Step 10: Finally setup the jdk in VSCode. To do that go user setting in VSCode and search by typing “java home”. Edit the json config file look like bellow